
Hi All,
So taking the hint from the comments in the VW T3 thread about posting in a non-Volvo forum, it's time to start sharing my rebuild here.
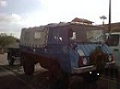
Well my truck is a Volvo TGB13 Command Cab 6x6, so where to start?
I bought it from Sweden back in 2006 and shipped it out unseen. The guy I dealt with was very helpful, even assisting with the shipping. There wasn't much choice as this particular variant is quite rare (and getting rarer).
Why the Volvo? Well why not? We had a Defender 110 Hardtop (ex FFR) which we imported from the UK after traveling through the Middle East for 6 months, but then when kids arrived, the layout became a problem. We wanted something bigger to convert to an overland truck, and having the ability to live inside is a definite advantage, but it needed to be able to be containerised. I looked at Pinzgauers, but couldn't find a hardtop, and the unconventional drivetrain, whilst clever, put me off. They also come with a price. I looked at the 101 Ambulance, but was put off by layout and the slightly ungainly appearance.
The Volvo, was a much more conventional and cost effective option. I always wanted to convert to diesel, and this conventional layout has some advantages.
Import to Australia was easy (pre 89), and registration was also uncomplicated. The only modification was to the seatbelts to meet ADR requirements. It is still LHD as it is more than 30 years old and therefore no requirement to convert. In fact the hardest part was finding someone to complete the Roadworthy, as I got turned away by many garages with a multitude of excuses.
There was quite a bit of excitement at registration due to paperwork errors, but easily fixed. On top of that, the CV boots decided to fail as I pulled up in the inspection bay, dumping a small pool of oil under the front axle. With some strategic wheel placement, this went unnoticed, and the first, of many fixes, went onto the list.
That was a few years ago...
Ian
Ian's TGB13 6x6 (Australia)
-
roobar_and_custard

- Posts: 81
- Joined: Fri Sep 07, 2012 7:18 am
- Location: Melbourne, Australia
Ian's TGB13 6x6 (Australia)
- Attachments
-
- VicRoads.jpg (159.69 KiB) Viewed 5378 times
-
- At the Engineer.jpg (154.38 KiB) Viewed 5378 times
-
roobar_and_custard
- Posts: 81
- Joined: Fri Sep 07, 2012 7:18 am
- Location: Melbourne, Australia
Re: Ian's TGB13 6x6 (Australia)
I really like the Volvo, but there are a few things that bug me about it, which I knew would when I bought it.
1) why is it petrol - needs to be diesel.
2) drum brakes are rubbish
3) needs power steering
4) stupid fuel filler
5) TOO noisy (actually painful!)
All of these planned to be fixed, and some in progress...
1) why is it petrol - needs to be diesel.
2) drum brakes are rubbish
3) needs power steering
4) stupid fuel filler
5) TOO noisy (actually painful!)
All of these planned to be fixed, and some in progress...
-
roobar_and_custard
- Posts: 81
- Joined: Fri Sep 07, 2012 7:18 am
- Location: Melbourne, Australia
Re: Ian's TGB13 6x6 (Australia)
Let's start with an easy one - fuel filler. Time to get rid of the silly tin can.
Aluminum casting from the US, fuel filler/hose from a Land Rover which allows for Jerry can filling without an adaptor.
Aluminum casting from the US, fuel filler/hose from a Land Rover which allows for Jerry can filling without an adaptor.
- Attachments
-
- Before.JPG (150.15 KiB) Viewed 5372 times
-
- During.JPG (130.04 KiB) Viewed 5372 times
-
- Inside.JPG (131.19 KiB) Viewed 5372 times
-
- After.JPG (134.26 KiB) Viewed 5372 times
-
- Extended.JPG (144.72 KiB) Viewed 5372 times
-
chosenview
- Posts: 45
- Joined: Sat Jan 14, 2012 3:05 am
- Location: Gloucester, England
- Contact:

Re: Ian's TGB13 6x6 (Australia)
Any reason why the fuel filler was placed so High on the bed?
Fat Fabrications
2993 FM 1647
Winnsboro, TX. 75494
fatfabrications@yahoo.com
(903) 365-2332 shop
(951) 765-7224 mobile
Facebook.com/dokapinz6x6
Www.fatfabrications.com
2993 FM 1647
Winnsboro, TX. 75494
fatfabrications@yahoo.com
(903) 365-2332 shop
(951) 765-7224 mobile
Facebook.com/dokapinz6x6
Www.fatfabrications.com
-
roobar_and_custard
- Posts: 81
- Joined: Fri Sep 07, 2012 7:18 am
- Location: Melbourne, Australia
Re: Ian's TGB13 6x6 (Australia)
A couple...
1) I heard that the Volvo has a tendancy to leak fuel due to the low position of the filler relative to the tank - especially on side slopes.
2) Suited the hose length.
3) Would allow for an auxillary tank to be added between the filler neck and tank - possible later addition
4) Looked nicer (to me anyway).
And yes it is quite high... but still seems OK.
-
roobar_and_custard
- Posts: 81
- Joined: Fri Sep 07, 2012 7:18 am
- Location: Melbourne, Australia
Re: Ian's TGB13 6x6 (Australia)
Main work recently has been the steering changes to allow for power steering, but also to reduce the number of turns lock to lock and free up some footwell space.
Basic concept is using a bevel box mounted to the floor and a Land Rover Discover steering box mounted backwards - per attached.
Basic concept is using a bevel box mounted to the floor and a Land Rover Discover steering box mounted backwards - per attached.
- Attachments
-
- Layout.jpg (30.71 KiB) Viewed 5294 times
-
roobar_and_custard
- Posts: 81
- Joined: Fri Sep 07, 2012 7:18 am
- Location: Melbourne, Australia
Re: Ian's TGB13 6x6 (Australia)
Bevel Box (mitre box) from a Honda Crossroad, GM Rodeo, etc...
- Attachments
-
- Bevel Box.jpg (115.14 KiB) Viewed 5294 times
-
roobar_and_custard
- Posts: 81
- Joined: Fri Sep 07, 2012 7:18 am
- Location: Melbourne, Australia
Re: Ian's TGB13 6x6 (Australia)
Upper column set up. Uses a Land Rover Freelander column on a custom mounting bracket, with plan for steering shaft to run down through floor ahead of accelerator pedal.
Gauges to be repositioned to somewhere else - yet to be decided.
This frees up heaps of floor space for your feet and avoids having to step around the column.
It also disconnect the column from the chassis which should help with interior noise levels, as the direct noise path is eliminated.
Gauges to be repositioned to somewhere else - yet to be decided.
This frees up heaps of floor space for your feet and avoids having to step around the column.
It also disconnect the column from the chassis which should help with interior noise levels, as the direct noise path is eliminated.
- Attachments
-
- Column comparison.jpg (127.92 KiB) Viewed 5236 times
-
- Prototype.jpg (147.88 KiB) Viewed 5236 times
-
- New Steering Bracket 2.jpg (138.11 KiB) Viewed 5236 times
-
- New Steering Bracket 3.jpg (120.01 KiB) Viewed 5236 times
-
- With Wheel.jpg (140.67 KiB) Viewed 5236 times

Re: Ian's TGB13 6x6 (Australia)
Where do I sign up for the next one, please? I really like the idea of clearing out that leg room - one of my only real complaints about the volvo - having power steering would be a nice plus.
Keep up the awesome work!
Keep up the awesome work!
Where science and technology fail, art survives.
-
roobar_and_custard
- Posts: 81
- Joined: Fri Sep 07, 2012 7:18 am
- Location: Melbourne, Australia
Re: Ian's TGB13 6x6 (Australia)
Lower shaft picks up from standard(unmodified) steering column UJ and drops out through the floor. It runs in front of the brake pedal and behind the accelerator pedal.
Sounds bad, but is actually well clear of your feet when operating the pedals.
UJ is very close to pedal box and intermediate shaft very close to master cylinder, but it all fits. It is a bit close the brake switch, but only a small issue.
Getting the alignment right has taken lots of fiddling and required two attempts at the top bearing bracket. And then multiple attempts at the lower bearing where it passes through the floor to meet the bevel box.
Lower shaft exits through the floor, and right through one of the reinforcements - which is a bit annoying, but not really a worry (last picture taken from underneath with original column/pitman arm removed).
And "yes" the wooden shaft will be replaced with a steel one...
- Attachments
-
- Lower Shaft.jpg (147.29 KiB) Viewed 5220 times
-
- Top Bearing mounting.jpg (153.3 KiB) Viewed 5220 times
-
- Upper Bracket 1.jpg (161.07 KiB) Viewed 5220 times
-
- Upper Bracket 2.jpg (120.2 KiB) Viewed 5220 times
-
- Shaft through Reinforcement.jpg (157.87 KiB) Viewed 5220 times
-
roobar_and_custard
- Posts: 81
- Joined: Fri Sep 07, 2012 7:18 am
- Location: Melbourne, Australia
Re: Ian's TGB13 6x6 (Australia)
The bevel box sits under the floor and turns the steering input through 90degress(ish) to point rearwards towards the new steering box location.
Steering shaft from inside runs through a straight coupling here - no additional UJs needed.
It sits pretty close to the chassis at the moment, but as I am planning a small body lift (10-15mm max) to put isolator mounts between the body and chassis, then this will not be a problem.
Although it does sit within the profile of the chassis rails, a steering guard will also be added to the front to protect the bevel box from "off-road" damage.
- Attachments
-
- Bevel Box Bracket.jpg (156.95 KiB) Viewed 5181 times
-
- Steering bracket.jpg (129.31 KiB) Viewed 5181 times
-
- Bevel Box to steering box.jpg (124.96 KiB) Viewed 5181 times
-
- Front End.jpg (158.24 KiB) Viewed 5181 times
-
roobar_and_custard
- Posts: 81
- Joined: Fri Sep 07, 2012 7:18 am
- Location: Melbourne, Australia
Re: Ian's TGB13 6x6 (Australia)
Steering box is from a RHD Land Rover Discovery, turned through 180degrees so the input shaft now faces forward, and with the pitman arm also turned through 180degress to correct the steering direction.
Number of turns lock-lock should now drop from around 5 down to around 3.5 - a much nicer proposition.
A new box section (replicating the original mounting) is then added to the back of the steering cross member for the steering box to attach to. Getting this position right took a little time as you need enough space for the UJ, but mustn't get too close to the sidewall of the footwell.
Steering shaft runs from the bevel box to the steering box, and once again - straight through a reinforcement!
Overall, pretty happy with the set-up.
- Attachments
-
- Steering Box.jpg (136.53 KiB) Viewed 5181 times
-
- Bracket.jpg (149.39 KiB) Viewed 5181 times
-
- Steering box Mounting.jpg (144.7 KiB) Viewed 5181 times
-
- Pitman Arm.jpg (130.71 KiB) Viewed 5181 times
-
- Shaft to box.jpg (148.84 KiB) Viewed 5181 times
-
roobar_and_custard
- Posts: 81
- Joined: Fri Sep 07, 2012 7:18 am
- Location: Melbourne, Australia
Re: Ian's TGB13 6x6 (Australia)
That's it so far, and that is around 6 months of work to get to this point!
Still to do...
Swap wooden shafts for steel, the one from the bevel box to the steering box needs to be a sliding joint.
Weld the steering box bracket on properly - cant easily access this area, so this will have to wait until I can lift the body off.
Reinforce the cut cross member - probably with a tube for teh shaft to run through, but not yet decided - again, difficult to access.
Connect the drag link to the pitman arm - which needs to be shortened to match the original. I'm thinking maybe a rose joint and re-drilling the arm to suit, but need to check the legalities of this.
Rebuild the dash panel around the new column.
Cheers,
Ian.

Re: Ian's TGB13 6x6 (Australia)
Ian - where did you get the Rodeo bevel boxes and what sort of cost are we looking at. Also in that pic of the steering box by itself, if you turn the input shaft to the right does the output arm come towards you or away.
Thanks
Garry
Thanks
Garry
1973 Haflinger AP700
1977 Landrover FC 101
2007 Range Rover Sport TDV6
1971 Jaguar Series 3 E-Type Conv
1957 Landrover 88" Station Wagon
1957 Landrover 88"
1977 Landrover FC 101
2007 Range Rover Sport TDV6
1971 Jaguar Series 3 E-Type Conv
1957 Landrover 88" Station Wagon
1957 Landrover 88"