Page 2 of 7
Posted: Sat Feb 28, 2009 7:42 am
by pcolette
It continues to look awesome! VERY nice job - wish my engine looked like that. Maybe some day.

What product are you using for undercoating?
Paul
Posted: Sat Feb 28, 2009 6:55 pm
by EvanH
At the risk of asking a dumb question...
How come you didn't paint the transfer case and differential housings?
-Evan
Posted: Sat Feb 28, 2009 9:55 pm
by milesdzyn
pcolette...I'm using a 3m rubberized product for the center mass area and the front nose area. It's a product I know and trust, but it is 3x the cost of other products.
The outer wheel well areas that are easy to get at is getting a new product that I have heard is good. I am assuming this area is going to get a lot of rocks thrown up at it, so I wanted something that can be easilly touched-up, out of a spray can. The Duplicolor rubberized undercoating with sound dampener sprays, looks and feels the same as the 3M product but only time will tell. So far I am impressed with it, and it is available almost everywhere, for underbody repairs and mods.
EvanH...Not a stupid question at all. I didn't want to paint any of the parts that are cast from aluminum for several reasons.
1. The corrosion protection isn't as important vs. metal parts. Even though aluminum will corrode it is easier to keep at bay.
2. Paint is fragile and must be touched up and maintained, so if it isn't needed I preffer to leave it raw.
3. If I were to paint them they would be painted Black and would make oil leaks more difficult to visually see.
4. I still have not decided what I will do to the aluminum parts. They may eventually get bead blasted and kept waxed.
I will be polishing out the valve covers when I get a good buffing attatchment for my wheel buffer.
The exaust and muffler will get a baked on ceramic finish to protect them.
Still lots to do, Miles
Wow...
Posted: Wed Mar 11, 2009 8:43 pm
by chacaocop1
The only question I have for you Miles is: How are you going to be able to go on mud with that beauty? If I take the time you took to restore your pinz to that level, I would refuse to even driving it when raining!!!

Posted: Thu Mar 12, 2009 3:19 am
by norcal pinz
wow!!!!!!!!!!!!!!
Posted: Thu Mar 12, 2009 9:40 pm
by Middlebury_Pinz
Beautiful job Miles!! My drivetrain was in good shape with low miles so I decided not to mess with it. If it ain't broke, don't fix it! I can sure appreciate what you did to yours though. I am really afraid to do much with mine now because it still hasn't been baptized with the first scratch yet. That one is going to hurt, a lot!! I am also afraid to wax the new OD paint for fear it will get a shine to it. Anybody have any expereince with a good paint sealant that won't put a shine on the mat finish?
Well done and keep up the great work! I look forward to seeing more pictures when you get time!
Posted: Fri Mar 13, 2009 2:20 am
by milesdzyn
chacaocop1.....No problems at all going in the mud, thats why I spent the time sealing her all up against premature corrosion. Now bashing against the rocks and swimming in salt water, that might take a while.
She'll be seeing a lot of desert and I'm experimenting with some paint not associated with painting vehicles. Behr makes a one part concrete floor epoxy that has the same sheen as military paint and can be custom mixed to any color. It sprays or rolls on, so touch-ups would be simple.
I'm testing it out right now, basically the body is going to be a rolling lab for some cheap finish options, easy touch-ups are what I'm looking for.
In the rear bed I'm testing a roll on bed liner that looked good but was to thin when I saw it in a truck bed. I asked the guy what he used and how easy it was to apply. He used one gallon of Plasti-Cote bed liner from Walmart but he was complaining about how thin it was. I asked him why he didn't use more layers to build up a thicker coat.
So I did a test on the trans access cover with 4 layers and it really looks good. So far I think it will take 2 gallons @ $45.00 per gallon, and 1 day to roll it on. I'll post pics when it's done.
Miles
Posted: Fri Mar 13, 2009 7:53 am
by andy
Miles...have you checked into seeing if Line-X can come up with the color you want and do the body with that? I've seen several Jeeps Line-X'd like that and this past deer season one guy had an F-250 done with it. Should reduce the pin stripping.
Andy
Posted: Fri Mar 13, 2009 5:49 pm
by M Wehrman
When I worked for a Dodge dealer,we had a customer request that his new cummins be rino-lined. Mind you this was the WHOLE TRUCK!

We did it,looked kinda kool at first,and went down hill from there(astheticly speaking). ALWAYS dusty,added a buttload of weight to the truck. One plus is that it was the quietest cummins I'd heard at the time inside and out. For the cost of the complete job,he could have had a complete paint job done years later when it started to look "ratty". I know that a Pinz is not a beauty going in but......
Mark
Posted: Fri Mar 13, 2009 9:31 pm
by pinztx
I had mine sprayed about a year ago. No major chunks missing has not faded much. I would do it again.
I put a small post on that subject so you would not have to look far. It is called the Gun Bus. I am in the last stages of having a rack built for the rear. Then it should be done. This will be sprayed black.
Posted: Fri Mar 13, 2009 9:35 pm
by pinztx
By the way use Line X I have used others in the past. It holds up better. I live and work in South Texas, this stuff works good. I have the bumpers sprayed on my trucks I had one bumper on 8 trucks in 5 years. When I would take it in to switch it over to the new one they would just put some sort of cleaner on it and it would look great.
Posted: Thu Mar 19, 2009 2:19 am
by milesdzyn
Well the roll-on liner took 5hrs to apply from start to finish.
I first prepared the surface by scuffing and wiping down with acetone.
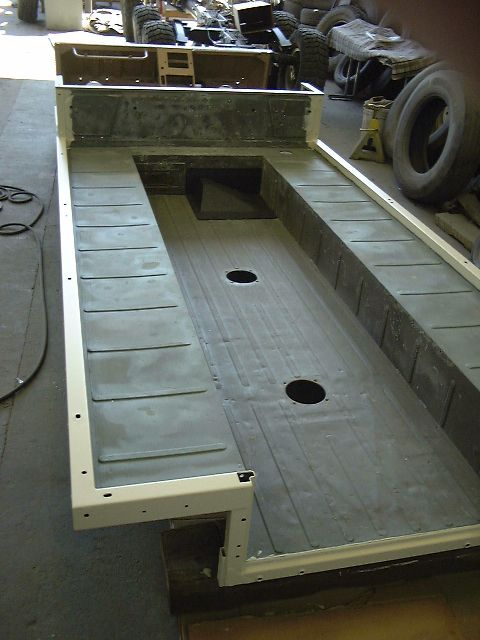
Taped off the edges and applied the first coat.
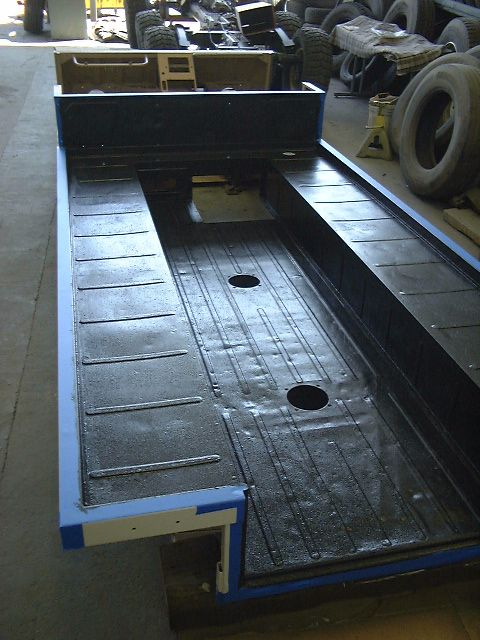
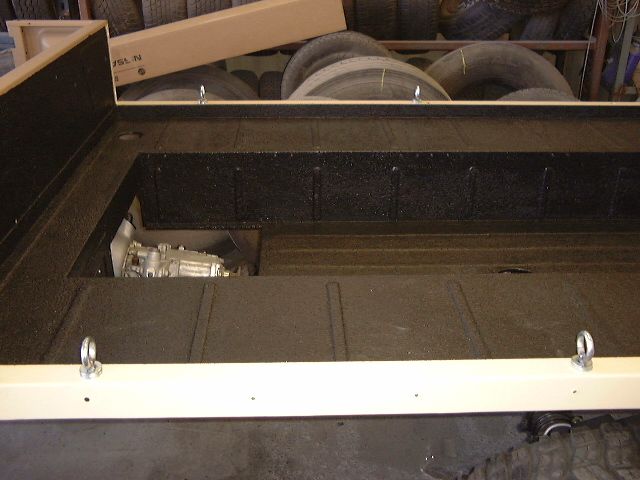
After 3 coats.
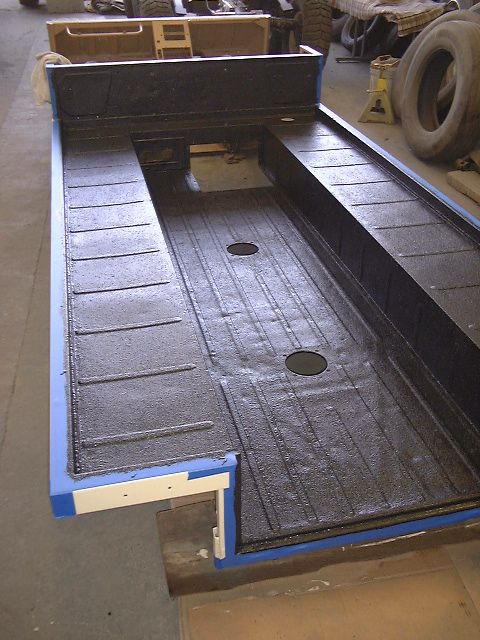
After 5 coats and tape removed.
A closer shot shows that you can roll the liner on and not clog up the screw holes.
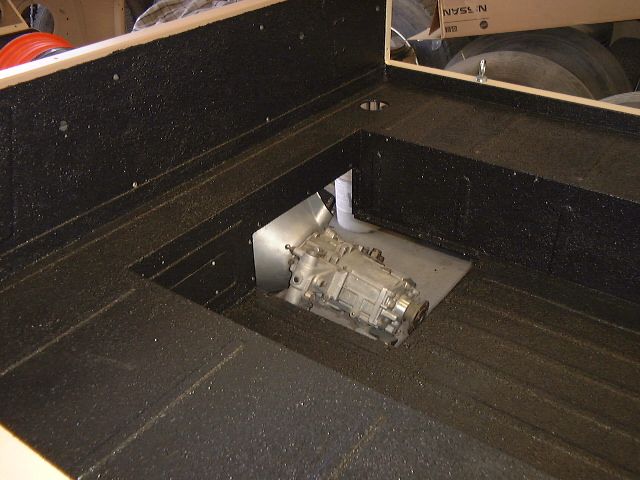
I used 2 gallons of roll on liner from Walmart, and got 5 layers applied. It rolled on easy and built up into a uniform pattern. It was easy to control the material and did not clog up the screw holes, thou it may be possible to do so if you are not careful.
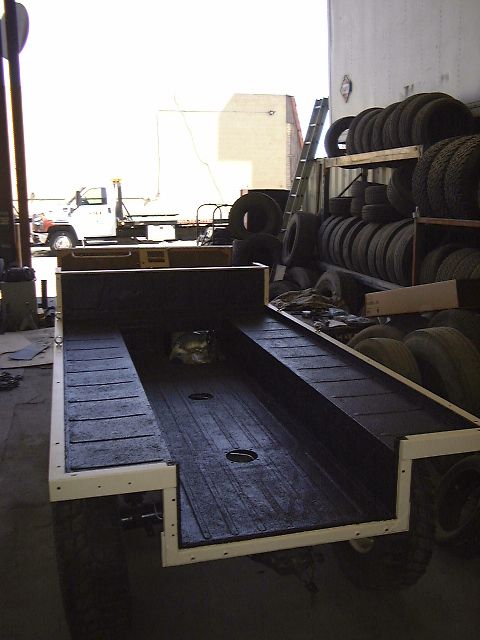
All in all, after the finish dried for 24 hours, I was very happy with it. How long will it last, only time will tell, but I feel that it will hold up to reasonable abuse.
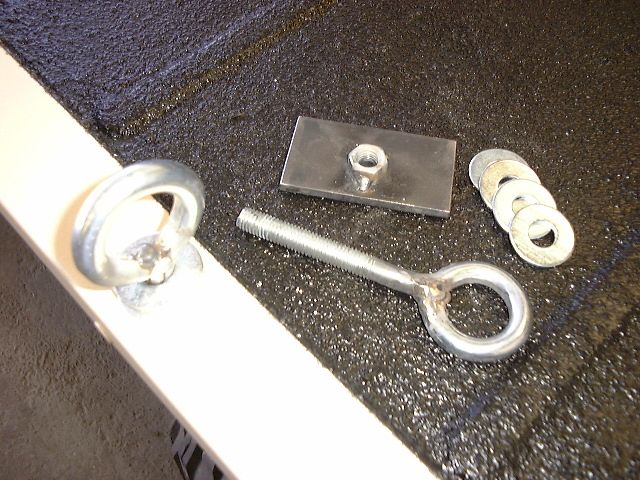
Here is how I lifted the body.
All the parts were purchased at Home Depot. Some welding was done to the rings and nuts.
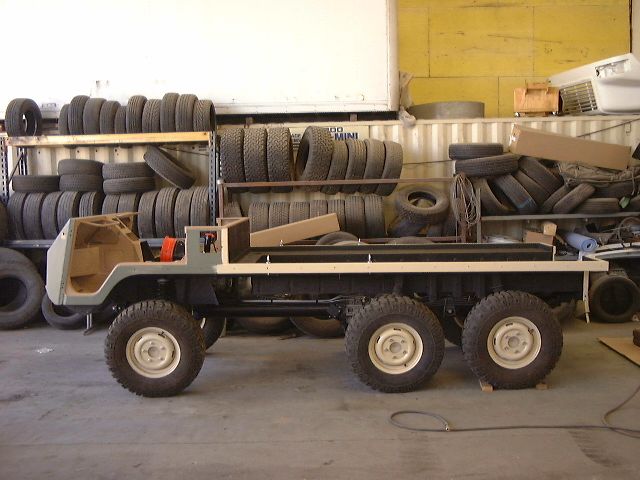
And the body tub mounted, what a PAIN.

Miles
Posted: Thu Mar 19, 2009 8:58 am
by andy
You are going to end up with one sweet truck. As one who is extremely mechanically challenged I am so jealous on a variety of levels. Very nice.
Andy
Posted: Thu Mar 19, 2009 9:36 am
by dr4yrk9
Cannot wait to see the finish product. Its going to be beautiful.
Ed
Posted: Thu Mar 19, 2009 10:18 am
by Erik712m
Looks real good Miles. I found I had to move the transmission cover holes do to the lining thickness. Does yours still fit bolt down?