
Any suggestions for an engine stand? I just bought a used engine that I
intend to rebuild, top to bottom. The rear housing doesn't look sturdy
enough to hang the engine, like you would, for instance, a small V-8.
Engine Stand
Moderator: TechMOGogy
Engine Stand
Jay
W3PNZ
710K Kommandowagen
W3PNZ
710K Kommandowagen
-
Middlebury_Pinz

- Posts: 121
- Joined: Wed Aug 13, 2008 2:00 pm
- Location: ELkhart, in
Jay,
If you have access to a parts manual or repair manual check in the back as I think one of them has a picture of the factory engine stand. It seems to me this was pretty cool as it looked like it could be used to support the drivetrain or engine for maintenance. If you don't have access to one, let me know and I will look it up and fax you the picture. It didn't look outrageous to build.
Mike
-
Jim LaGuardia
- Posts: 1707
- Joined: Wed Apr 14, 2004 3:42 pm
- Location: San Bernardino Ca
- Contact:
Thanks for the replies Mike and Jim.
I would imagine that the factory stand is pretty pricey - maybe not cost
effective unless you do a lot of engines.
Jim, I would be very interested in seeing some photos of your homebrew
stand. The photos in the link all seem to show the factory stand.
Incidentally, I started tearing down the used engine that I bought. The PO
said it was blowing a lot of smoke, so I figured new rings for sure. What I
found was that everything measured like new and rings look like new.
Lots of carbon in the heads and on top of the pistons. Everything below the
compression rings was squeaky clean. I'm guessing that all this engine
needed was a new set of intake valve seals and a carb adjustment.
Jay
W3PNZ
710K Kommandowagen
W3PNZ
710K Kommandowagen
-
Jim LaGuardia
- Posts: 1707
- Joined: Wed Apr 14, 2004 3:42 pm
- Location: San Bernardino Ca
- Contact:
Added this to my things to make list!
Just added this to my things to make list! Nice design! Good project for the welding 101 class I am taking.
Scottie
Scottie
-
Jim LaGuardia
- Posts: 1707
- Joined: Wed Apr 14, 2004 3:42 pm
- Location: San Bernardino Ca
- Contact:
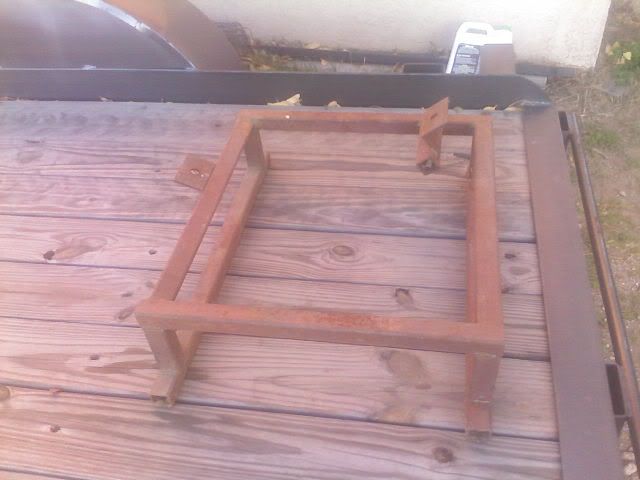
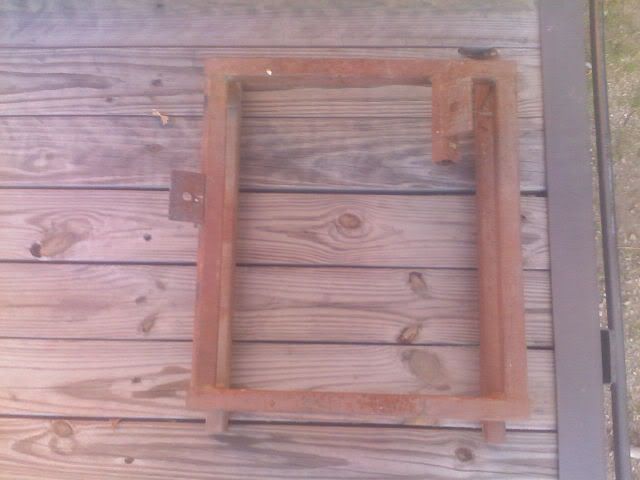
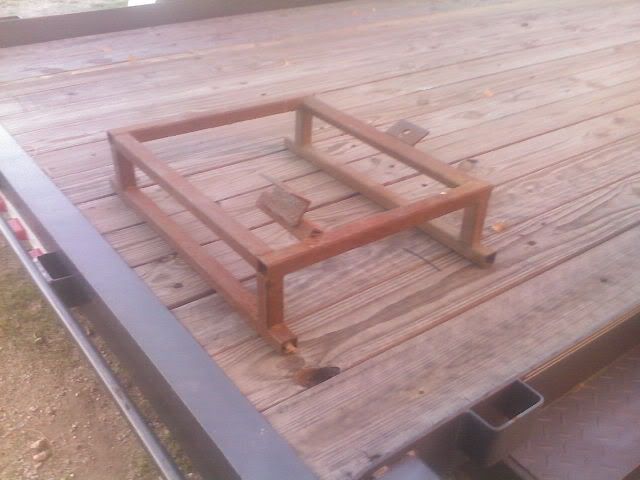
Here is the dimensions and a list of materials needed to make the engine stand.
It is basically an elevated frame 22.5 inches long and 19 inches wide made from 1 inch square tube steel.
The following is all 1" tube steel unless otherwise noted.
(2) 26"(base feet), (4 ) 4" (uprights), (2) 19"(upper platform ends), (2) 20"(upper side), (1) 5"(mount spacer passenger side)
and (2) mounting plates made from 2" angle Iron 3" long drill mount hole 1" from edge in centered on mounting surface.
Look at the picture carefully before welding to position l side and rt mountings correctly.
Enjoy...........................................