Overhead Console
Posted: Sun Jan 22, 2012 6:46 pm
Update: I needed to update the photos of my overhead console, so the text is also updated to reflect the changes that have occured since this was first posted. Sorry that some of the images are sideways (anyone got a solution for that?).
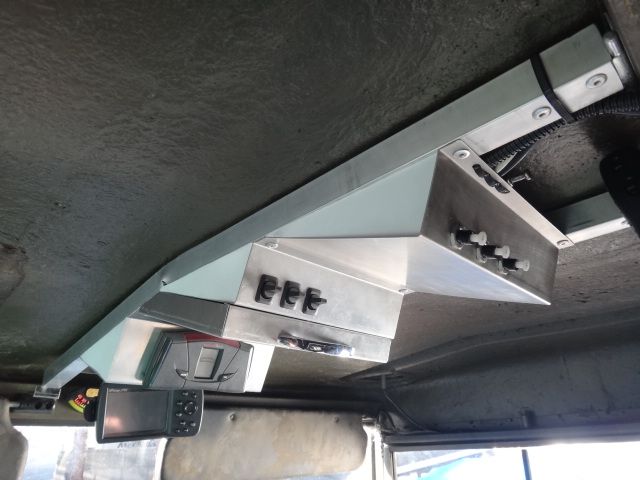
I finally got a round to fabricating an overhead console for my 712W. This truck is unusual in that it came from the Swiss with a fiberglass hard cab roof. I wanted a console where I can mount light switches (the three in the pictures are for three sides of floodlights) and possibly mount my GPS, tire pressure monitor, or backup camera display, eventually. With so much possibility I wanted flexibility to mount different things in different places. I may have to replicate it for my 710M.
I took some 1" square aluminum tube that was bent to fit the contour of the roof (the bends are ugly, but that's how they came out from the brake press); the rear ends are hinged to the rollbar. This way the whole assembly can hinge downward so I can get to the wiring above. I used some springy stainless sheet and cut out "clips" that mounted behind the visor ends; they spring forward as the bars rise until the clips pop back into the top edge of the inside of the tube. To release, I put a notch in the lower edge of the tube so I can insert a screwdriver to pry the clip forward. I have some foam above the tubes that give the assembly some push downward to prevent rattles. The wiring hinges neatly as well when it is lowered; the tubes almost brush the edge of the doghouse cover when down.
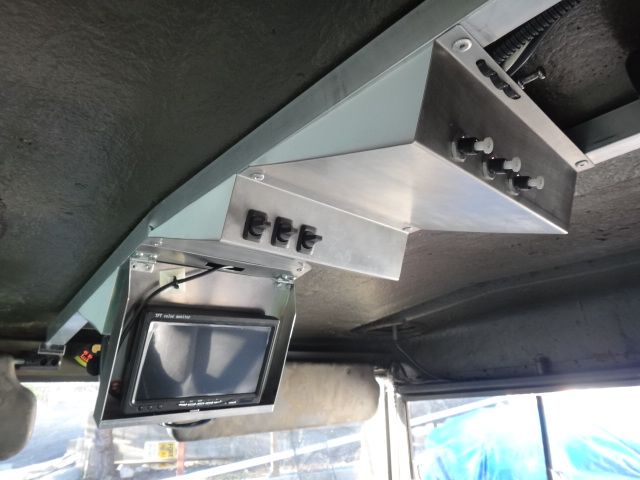
I have four bays installed; the rearmost bay is the hardest to see so that is where I placed circuit breakers. The switches are LED illuminated and I set them up so that they are dimly lit when off (so they are easy to see at night) but go to full brightness when on (so I won't forget that they are on). I can make each bay to fit what is needed; the aluminum sheet is just pop riveted to the tubes and can be changed or modified as needed. I have room to expand if I need more switches, controls, or gauges. I covered the openings in the side for aesthetic reasons. I have a hinged panel that fits against the bottom of one section; it holds the backup camera monitor. I used magnets to hold it closed up against the console when not in use, and used a microswitch to turn the monitor on when opened, off when closed.
From rear to front I have circuit breakers, flood light switches and Go Light control, tire pressure monitoring and inside/outside thermometer with backup camera monitor hinged below, and GPS at the front.
Closeup of the clips, and how they fit into the tube. Note notch on bottom edge of tube to get the clips released:
And when hinged open it is easy to wire. Note the double headed nail that I use to unclip the clips (the nail fits into a clip at the back of the console where it is always available; you can just see the double heads above the circuit breakers in the first photo):
I finally got a round to fabricating an overhead console for my 712W. This truck is unusual in that it came from the Swiss with a fiberglass hard cab roof. I wanted a console where I can mount light switches (the three in the pictures are for three sides of floodlights) and possibly mount my GPS, tire pressure monitor, or backup camera display, eventually. With so much possibility I wanted flexibility to mount different things in different places. I may have to replicate it for my 710M.
I took some 1" square aluminum tube that was bent to fit the contour of the roof (the bends are ugly, but that's how they came out from the brake press); the rear ends are hinged to the rollbar. This way the whole assembly can hinge downward so I can get to the wiring above. I used some springy stainless sheet and cut out "clips" that mounted behind the visor ends; they spring forward as the bars rise until the clips pop back into the top edge of the inside of the tube. To release, I put a notch in the lower edge of the tube so I can insert a screwdriver to pry the clip forward. I have some foam above the tubes that give the assembly some push downward to prevent rattles. The wiring hinges neatly as well when it is lowered; the tubes almost brush the edge of the doghouse cover when down.
- DSC05032.JPG (111.73 KiB) Viewed 2777 times
I have four bays installed; the rearmost bay is the hardest to see so that is where I placed circuit breakers. The switches are LED illuminated and I set them up so that they are dimly lit when off (so they are easy to see at night) but go to full brightness when on (so I won't forget that they are on). I can make each bay to fit what is needed; the aluminum sheet is just pop riveted to the tubes and can be changed or modified as needed. I have room to expand if I need more switches, controls, or gauges. I covered the openings in the side for aesthetic reasons. I have a hinged panel that fits against the bottom of one section; it holds the backup camera monitor. I used magnets to hold it closed up against the console when not in use, and used a microswitch to turn the monitor on when opened, off when closed.
- DSC05033.JPG (102.37 KiB) Viewed 2777 times
Closeup of the clips, and how they fit into the tube. Note notch on bottom edge of tube to get the clips released:
- DSC05035.JPG (86.31 KiB) Viewed 2777 times
- DSC05036.JPG (67.19 KiB) Viewed 2777 times
- DSC05037.JPG (126.05 KiB) Viewed 2777 times